Receivables
Receivables Landing Page
The Receivables screen shows details about files that have been billed.
Payments for Factored Offices are received at Home Office, posted to the appropriate invoice number, and data is displayed in the Receivables screen. Factored Offices use the Receivables screen for reporting and collection purposes.
Non-Factored Offices need to manually enter their payments into the Receivables screen. Non-Factored Offices work their own accounts receivable and manage payments from Clients directly. They enter payments received both from Clients and from Home Office.
Notes:
Each invoice has multiple lines. Every transaction type update adds a new line item to the invoice. Use Sort, Search, Filter or Group functions to find specific Invoices.
Reviewing the Receivables Screen
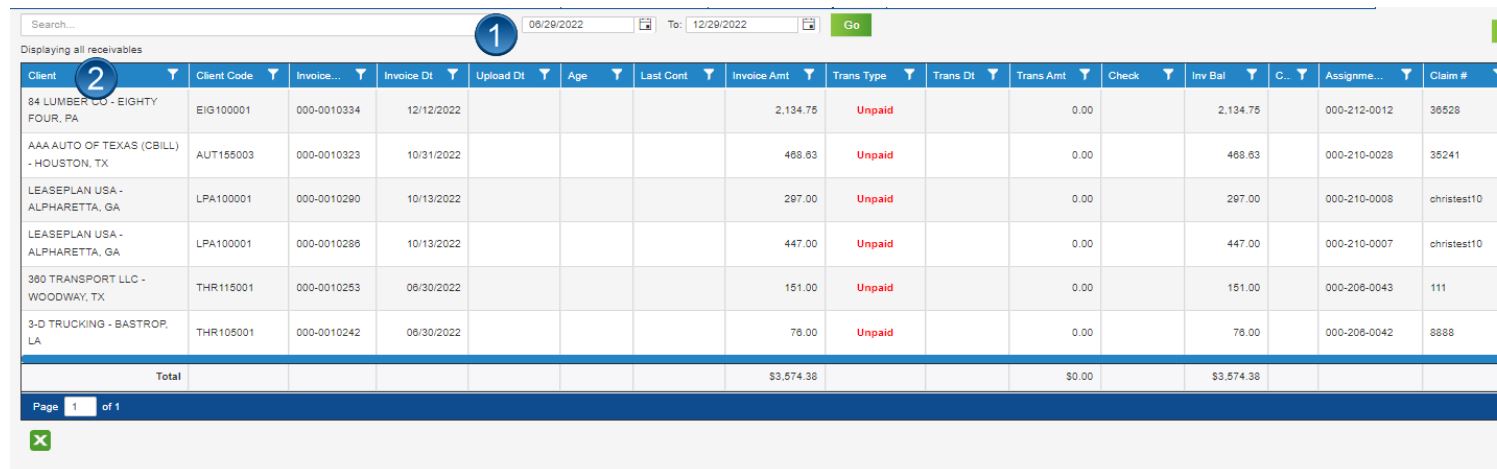
Users can drag and drop columns to personalize the Receivables screen. Since the data is presented in a grid format, users can filter, sort, search, or group columns to find specific data. The system presents data from the last six months. Users can change the date range, as needed.
Receivables Screen

-
Enter a beginning and an ending date in the date range to see items for that time period (for the Invoice Dt column).
-
The Receivables screen shows data in a grid format. Altering criteria using search, sort, filter, or group alters the grid display.
-
View invoices that are in Collections.
-
Access the Weekly Report for a given date range using this button.
-
View check stub data using this button.
-
Non-factored Offices click the Unlock Grid button to update the Receivables grid.
-
Users can access system Help contents by clicking the Help icon.
-
Export the grid's contents to Excel to create reports, if needed.
User Access
The following users have access to update the Receivables screen:
- WebFMS Administrators
- Franchisees / Office Managers
- Office Staff
- Home Office users in the Accounting Department
All other Home Office Groups have view only access to this screen.
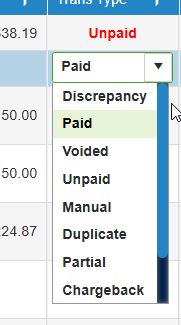
Transaction Types
The Receivables screen shows several different Transaction Types. The system applies some type labels and users apply the others. Office users can only select Discrepancy, Duplicate, or Write Off types. Below are definitions for all Transaction Types.
Discrepancy — Partial payment to an Invoice with either an amount still due or an overage to account for.
Paid — This line item pays an Invoice in full.
Voided — This transaction type applies to invoices that have been created or partially created and then deleted due to error.
Unpaid — An Invoice is unpaid when there are no Client funds listed against it.
Duplicate — A duplicate results when a Client sends in two payments for an invoice.
Write Off — There may be times when an Office receives partial payment from a Client and does not want to collect the remainder of the total due. To bring an invoice balance to zero, use the Write-Off option. Write Offs do not upload on the Weekly Report as a paid item. No royalties will be due on Write Offs.
*These Transaction Types (in italics) are available for Non-Factored Offices to choose for any given line item.
Updating Invoices in Receivables
- From the Assignment Listing Screen, click the Receivables icon. The Receivables screen appears showing all the Assignments that have been completed. Assignments are listed by invoice and may have a variety of Transaction Type statuses.
The Receivables Screen
-
Click the Unlock Grid button to update the data on the screen
-
Use search, sort, filter, or group find a specific invoice.
-
You can add a full payment or a partial payment to an invoice:
a). To add a full payment to an invoice: right-click the invoice line and select Add Payment. A new line appears directly below the selected invoice, and the amount in the invoice’s Inv Bal column auto-populates the Paid line’s Trans Amt column. Trans DT auto-populates as well.
b). To add a partial payment to an invoice: right-click the desired invoice and select New Line. A new line appears under the original invoice number.
Entering a new line to add payment in the Receivables Screen

- Click the TransTyp column within the new line and select Discrepancy transaction type.
Transaction Selections
-
Tab to the TransAmt column to enter the amount of the partial payment. Do not enter a negative amount. The system automatically handles the amounts according to accounting rules. The Trans DT column auto-populates.
-
Enter the check number in the ck column.
Click the SAVE button.
Sending Invoice Notifications
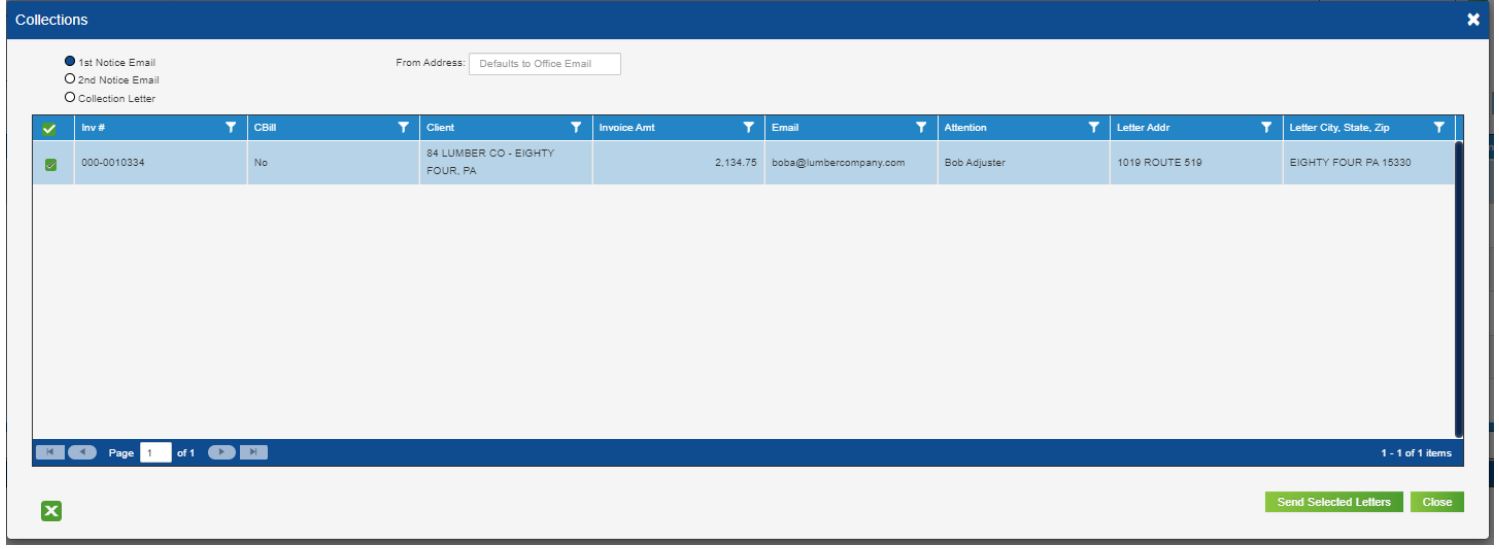
Users can send notifications to clients for collection purposes from the Receivables screen.
Notes:
-
FMS uses the invoice email for notifications.
-
If no invoice email address exists, the system uses delivery email instead.
-
Enter or change an email address in the Email column on the Collections screen, if needed. Click inside the field and type the new address. Note: This does not update/save the entered email for future notifications.
-
The system adds a Diary entry for each email sent, successful or not.
Follow these Steps to create a Notification email for a single invoice:
-
Select the desired invoice(s).
-
Right-click the invoice's row so the Context menu appears.
***Follow these Steps to create a Notification email for a single invoice:
-
Select the desired invoice(s).
-
Right-click the invoice's row so the Context menu appears.
Receivables Screen Showing Context Menu
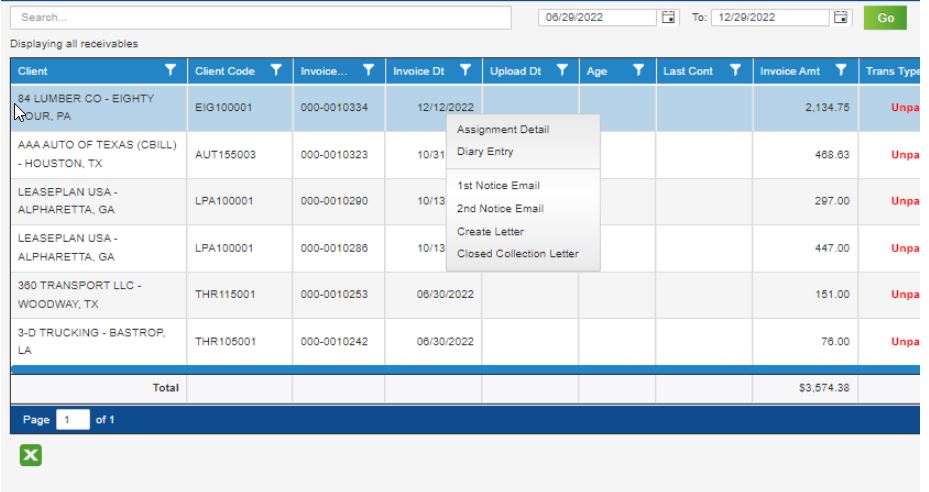
- Select the specific notification type you want to send. The Collections screen appears.
Collections Screen
-
Check/uncheck files as needed.
-
Edit the From Address if needed. If left empty, the notification(s) will show sent from the office email.
-
Click Send Selected Letters to send. After clicking the Send Selected Letters button, a system prompt appears. Click OK to proceed. Otherwise, click Cancel.
Weekly Report
Running the Weekly Report
Factored Offices upload everything the Office has billed for a given week.
Non-Factored Offices upload what has been billed for the week and what has been received in payments (two part report).
The AS400 Weekly Report Screen shows various options you can select when running the Weekly Report.
1 — Select a Date Range to view a particular Weekly Report.
2 — Office shows the current selected Office. Home Office users can select different Offices.
3 — The Trigger Resend button is only for Home Office users with the appropriate permissions.
4 — Use the PDF button to download the Weekly Report for the selected date range.
5 — Use these arrow controls to view previous Weekly Reports. Users can move back and forward up to the current Weekly Report within a selected date range.
6 — Weekly Report data appears on the screen.
If Status shows true then the Office had a successful upload. If the Status shows false, the upload was rejected. Home Office will handle rejected Weekly Reports.
Verify Weekly Report Upload
To verify that your weekly report has been successfully uploaded, click the Weekly Report button then select the appropriate date range. The Weekly Report screen appears with a recap of data sent in.
Suggestion: Save your PDF as dd.mm.yy.WeeklyReport.pdf in a folder you create to store your Weekly Reportsb
Checkstub
Once a Factored Office has uploaded their Weekly Report and a positive check has been issued, the check stubs will be processed. WebFMS pulls data from the AS-400, which is the financial system of record for Alacrity.
Check Stubs for a Factored office will show the Gross Amount of Invoices adjusted for:
Royalty Factor Fee Insurance Mitchell Chargebacks Chargeback Payments Over / Under Payment Adjustments Other Miscellaneous Adjustments
Check Stubs for a Non-factored Office are processed every Friday and show payments and miscellaneous adjustments.
Franchisees or Office Managers can search for check stubs between a range of dates or they can filter, sort, group, or search the Check Stub’s grid to find specific data. The dates are based on the check date.